How to Add Widgets to WordPress Blog
Jun 25, 2012, by admin
 First, if you are using a hosted blog on WordPress.com, you can’t add a javascript Widget like LeadsLeap Widget.
 In this article, we are talking about self-hosted WordPress blog, one that you install on your own server.
There are two ways to add a widget.
1) By editing the Theme’s html code
2) By using a plugin
1) By editing the Theme’s html code
If you understand some basic html, you can go to your WordPress Theme or template and add the widget code manually.
Here’s how Add Widgets to WordPress Blog:
Login to your server via your preferred FTP client, select the directory where you install your wordpress files and go to wp-content > themes > (your current theme).
Look for a file named sidebar.php and open it. (Some themes may call it another name. Go through all the files in the folder. You should be able to figure out which is the correct one.
Study the html code and see where you want the widget to appear. Then, simply copy and paste the widget into the code.
Another way is to edit the html code directly from your WordPress admin. Just go to Presentation > Theme Editor and choose sidebar.php to edit.
The problem with this alternative method is that you have to set the permission of sidebar.php to 766 before you can save the changes. But by default, the permission is set to 644.
If the above method sounds ‘rocket science’ to you, your last chance is to use a plugin.
2) By using a plugin
Using a plugin is an easier way to manage not one but all your widgets. It’s excellent for those who knows nothing about html.
The plugin I’m talking about is Fuzzy Widget Plugin. You can download it here.
Installing the plugin is pretty straight forward. Just follow the given instruction. If you’ve installed a plugin before, the method is about the same.
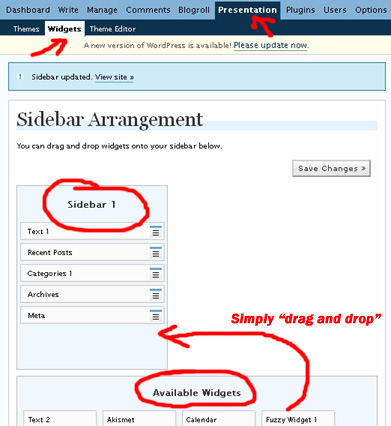
Once the plugin is installed and activated, login to you WordPress admin, go to Presentation > Widgets.
The screenshot below is for your reference. (Note: Your admin area may look slightly different because my WordPress version is not the most update one.)
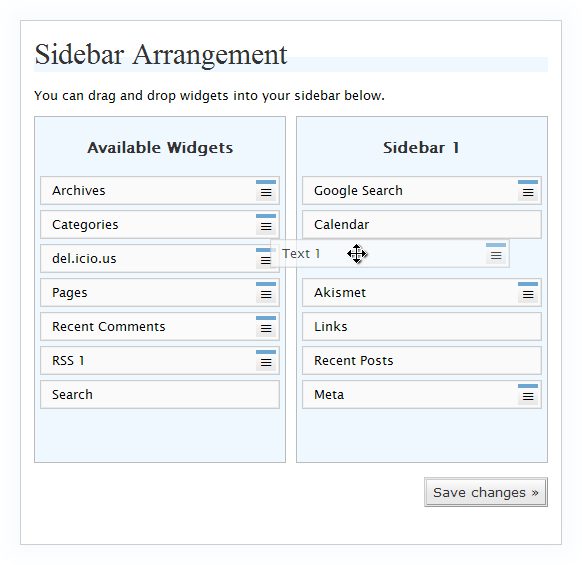
 From the screenshot above, you can see a “Sidebar 1″ and “Available Widgets”. You can drag widgets from Available Widgets to Sidebar 1 and arrange the position of the widgets in Sidebar 1 in any way you like.
Just play with it. You’ll understand what I mean. It’s very easy.
Now, LeadsLeap Widget is not one of the standard widgets available. So you have to manually add it in.
Here’s how to do it:
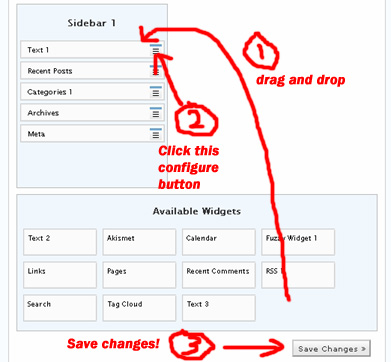
 Step 1: Drag an empty widget (both Text 1 and Text 2 are empty widgets) from Available Widget to Sidebar 1
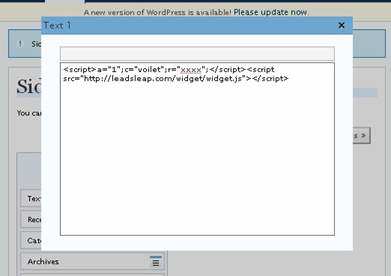
Step 2: Click on the configure button. You will see a popup form as shown below.
 Leave the first field empty. Copy and paste your LeadsLeap widget code into the second field as shown and then close it by clicking the ‘x’ sign.
Step 3: Save the changes.
Done.
Go to your blog and you should see LeadsLeap widget in the sidebar of your blog.
There are other standard widgets such as Recent Posts, Calendar and Recent Comments that you can play around with in Fuzzy Widget Plugin. Also, you can easily adjust the position of different widgets by simply “drag n drop”.
Note: For maximum clickthrough, try to position LeadsLeap widget at the top.
Have fun playing with this plugin.

