How to increase jpeg image quality
Jul 14, 2012, by admin
![]() The JPEG (Joint Photographic Experts Group) image format enjoys widespread use on the Internet due to its ability to display many colors while maintaining a relatively small file size. The downside is that JPEG uses a “lossy” compression method, which causes noticeable damage to image quality. These compression relics include “mosquito noise” commonly found around edges such as eyes, square-shaped noise distortion known as “blockiness” or “checkerboarding”, fuzziness and loss of edge clearness. If you don’t mind sacrificing the small file size and want to fix up a JPEG for professional, high-quality use, read this article.
The JPEG (Joint Photographic Experts Group) image format enjoys widespread use on the Internet due to its ability to display many colors while maintaining a relatively small file size. The downside is that JPEG uses a “lossy” compression method, which causes noticeable damage to image quality. These compression relics include “mosquito noise” commonly found around edges such as eyes, square-shaped noise distortion known as “blockiness” or “checkerboarding”, fuzziness and loss of edge clearness. If you don’t mind sacrificing the small file size and want to fix up a JPEG for professional, high-quality use, read this article.
Saving a file with many colors as a JPEG can greatly reduce its quality, which may be unacceptable for professional, high-quality projects.
Steps to increase jpeg image quality
1.Find and evaluate the problem. We’ll start by looking at an image damaged by JPEG compression at 300% zoom. Notice the blocks and compression discolorations around the eye:
This is a typical example of JPEG compression damaging the quality of an image. All JPEGs will show signs of this damage to some degree. If the complete image is to be used, it’s important to eliminate any compression artifact noise
 This is a typical example of JPEG compression damaging the quality of an image.
Remove the largest, most obvious JPEG compression artifacts with one or both of the following filters.
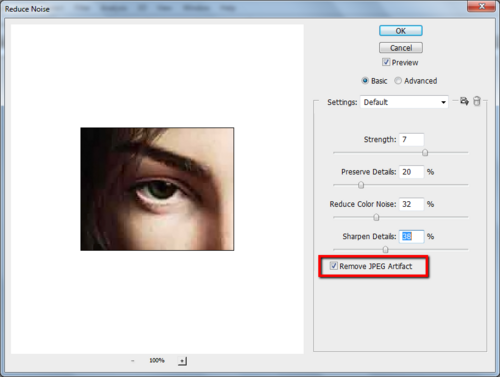
Photoshop includes a good JPEG compression artifact remover that substantially helps reduce JPEG checkerboard noise. To access it, go to Filter >> Noise >> Reduce Noise.
Set the strength to reflect the desired degree of noise removal; it should be higher for JPEGs of worse quality. Setting the “preserve details” to a lower percentage will make the picture blurrier and softer, but will also decrease more noise. You may want to compensate for a low “preserve details” setting with a higher “sharpen details” setting, as that will make the edges of your image clearer. Make sure “remove JPEG artifact” is checked.
This is the settings box of Photoshop’s noise reduction filter. Play around with the settings until the preview on the left looks less compressed but still has the necessary details.
A better solution is a free-trial JPEG removal tool called Topaz DeJPEG. It’s a plug-in that works with both Photoshop and Irfanview, so it’s good for people who don’t have Photoshop.
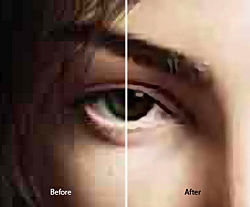
 Topaz DeJPEG was applied to the “after” side.
Note that the native Photoshop algorithm usually does not do a good job with JPEG mosquito noise, discoloration, or fuzziness, and those finer details will have to be resolved using the next steps.
3.Use the brush tool to minimize mosquito noise and color blocking in large areas without much fine detail. (E.g., human skin, cheeks, hair.) Your goal is to make the different color transitions in the image to be as smooth as possible. Leave important structural details in specific objects (e.g., eyes, ears, insect wings) for the rubber stamp (clone) tool, which will be covered in the next step.
Zoom into the image until you can clearly see the color blocks in the area you’re working with. Depending on the size of your image, this will usually be a 300% – 400% zoom.
Use the eyedropper tool to select a color near the colorblocks that you’d like to remove.
Select the brush tool.You will essentially be lightly painting over the colorblocks.
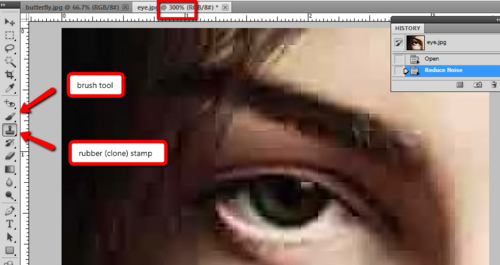 Note the location of the brush and rubber stamp tools, as well as the 300% zoom setting.
Set your brush hardness to 10%, opacity to 40%, and flow to 100%. (You may have to click on the brush size in order to see the hardness setting.) Using one-clicks, “dab” the paint brush over the colorblocks. Do not hold your cursor down and paint over the image or it will appear unnatural. Feel free to switch colors liberally to accurately match the colors, shadows, and highlights of the original picture. The eyebrow has been done in the following example.
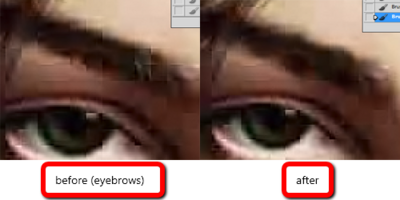 Lower the brush opacity to 10% for smoothing over transition areas, such as where the eyebrow meets the skin. You’ll want to pick colors from both the skin and the eyebrow to dab over this transitional space. Because of the low opacity, any changes that you make will be incremental and thus appear natural, so don’t be afraid of dabbing skin color on the eyebrow edge and vice-versa.
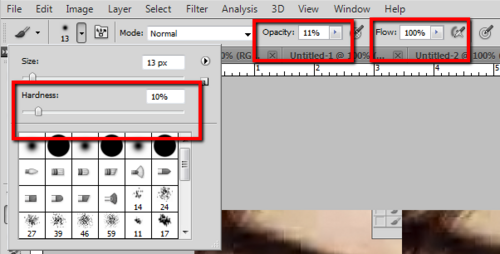 Note the location of the brush setting options.
Use the rubber stamp or clone stamp to fix small areas with great fine detail. (E.g., eyes, wings, teeth.) Because it’s hard to pick one color that would be appropriate for dabbing with a brush in these areas, we can compensate for that by using the rubber stamp to get an exact match of colors. The rubber stamp allows you to select an area of the image that you can factually stamp and replicate elsewhere on the image.
Select the rubber stamp from your toolbar and hold down alt until the cursor turns into a crosshair in a circle. Select an area right away next to a color block or other compression artifact, but avoid the color block. You wouldn’t want to stamp any compression artifacts!
Set the brush size to what’s appropriate for dealing with the compression artifact — you probably want to stay between 1 and 10 px. Set the hardness to a value between 10 and 30% and opacity to 30%. Use the same one-click “dabs” to fix the color blocks. Frequently re-select the area you would like to be stamped (by holding down the alt key) as you move across the image.
Again, decrease the cloudiness for transitional areas. Color blocks sometimes interfere with the shape of the image (note where parts of the iris are not a smooth round shape but rather interrupted by protruding lines). In order to get rid of those, you may have to use dabs to essentially re-draw those edges. See the iris in the following example.
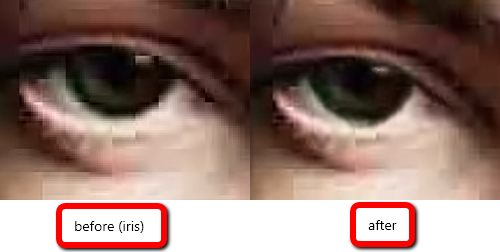 Repeat steps 3 and 4 throughout your image until you are satisfied with the results. Periodically zoom out to 100% to make sure that your image is turning out properly.
Save your new image as a high quality JPEG or a PNG, which supports more colors . You don’t want your efforts to be wasted with another round of compression.
In Photoshop, go to File >> Save for Web & Devices.
In the drop-down menu, select “JPEG” and set the quality to a value between 80 and 100. Note that higher quality involves a larger file size.
Alternatively, select “PNG-24” to save your file as a PNG. PNGs typically are larger than JPEGs, but they do not heavily compress images.


