Joomla Tutorial – How to Install Joomla 1.0 Manually on your Web Server
Jun 08, 2012, by admin
 Joomla Tutorial For Beginners
You can follow these instructions if you want to perform a manual installation of Joomla for your web site.
Pre-installation Steps
Step 1: Database setup
In order to use Joomla, you would need to make a MySQL database and a user with all the necessary privileges to access the database.
Step 2: Upload the installation files
You have to upload the Joomla installation files to your web hosting account. You can download the latest release from the official Joomla web site.
The downloaded archive should be extracted locally on your computer. Once this is completed, the files should be uploaded to your web hosting account. In order to do so you can use an FTP client. For detailed information on that matter please check our FTP tutorial.
Please note that if you would like the Joomla installation performed for your domain name thus making it accessible at http://www.your-domain.com, the installation files should be uploaded directly under the public_html folder for your account. If you would like the installation performed in a sub-folder or for a sub-domain name the files should be uploaded in the corresponding directory located under the public_html folder.For example if you would like the installation performed for: http://www.your-domain.com/joomla, the installation files should be uploaded under public_html/joomla.
Joomla 1.0 Manual Installation
Pre-installation checks:
In this step the Joomla installer checks the server configuration and verifies all the settings needed for the installation. normally on all Joomla-optimized servers all the checks should be passed without any troubles and the status will be marked in green.
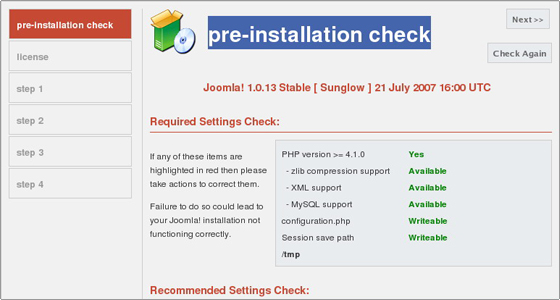 If any custom settings are enabled for your account this might hold up with the Joomla installation. In such case the pre-installation check will notify you exactly which requirement is not met, the status will be marked in red and if available more information will be displayed. If so the issue must be resolved and the check run again.
Once all checks are successfully passed you can proceed with the installation by clicking the [Next] button.
GNU/GPL License agreement.
Please go through the Joomla GNU/GPL License. Any terms, conditions and rules for using a Joomla installation are listed there. After you have checked it you can continue to the installation by clicking the [Next] button.
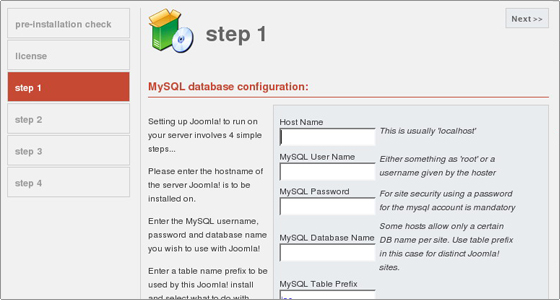
Step 1: MySQL database configuration
You should have already created the needed MySQL database and username added to it in Step 1 of the pre-installation instructions. The details should be entered in the corresponding boxes.
Note, that the names of the database and the user are prefixed with “username_” where username is your cPanel login name.
Do not forget to type in the password of the MySQL user and note that it is case-sensitive.
For Host Name you should use localhost. All other check-boxes and fields can be left to the default ones. Click on [Next] and a popup will appear, asking you to confirm that the information you entered is correct. If you made a mistake, you will be taken back to this page to correct it.
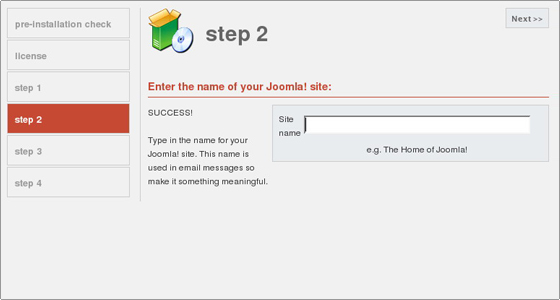
In this step you should choose the desired name for your web site. It will be displayed on the top of the web browser when your web site is accessed and will be used in e-mail messages sent from your Joomla installation. Note that this can be altered later from the administrator back-end.
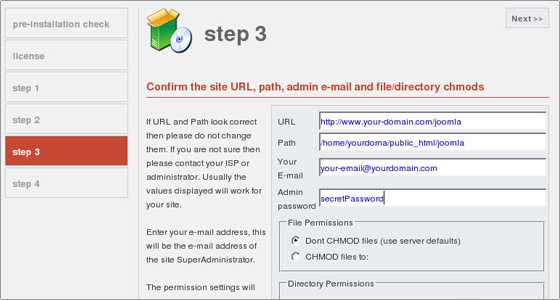
 Step 3: Confirm the site URL, path, admin e-mail and file/directory chmods
This is an important part of the installation, where you are asked to confirm the URL and system path to the files as well as the permissions you would like set for them. It is highly adviseable not to change the options that were automatically generated and leave them as they are. Also it will be best to supply a valid email address. Of course the administrative password can be changed to a desired one.
 Step 4: Completing the installation
Before you can access it, you have to delete the directory called “installation” that is located inside the Joomla directory. This can be done using either an FTP client or cPanel’s File Manager.
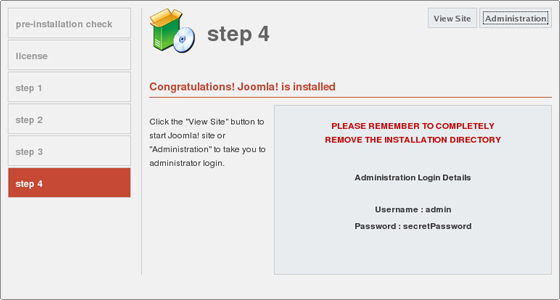 You will be provided with the administrative login details for your Joomla installation in this screen. You will be able to click the [View Site] button to access your new Joomla site or [Administration] to take you to administrator login.
Well done! You have successfully installed the Joomla! system on your website!


